Lap Description of Summit Point (main circuit)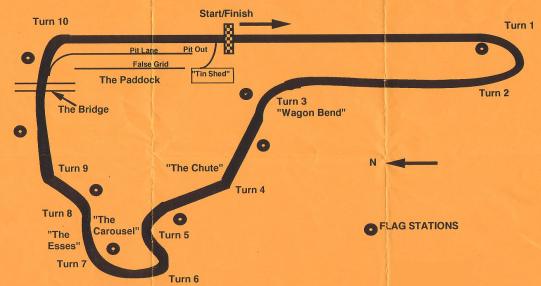
|
|
Summit Point is notoriously slick, especially when you’re not on the
concrete strip patches that exist in some of the corners. And off-track is
very unfriendly...don’t go there. If its wet, tip-toe and you’ll beat
anyone who doesn’t (because they’ll go off). On the other hand, most of
the “curbs” are pretty much horizontal, and can usually be used as extra
track (except if its wet). |
 In top gear approaching the end of the front straight, Turns 1-2 is
best taken with a single, late apex. There’s an access road on the left,
and you can use the extra radius it provides before turn-in. You won’t be
able to go to full power past the apex until the car is straight, its that
slick. In most cars its 3rd gear; although the instructors there may
recommend you start with trying it in 2nd, I think the extra torque at the
top of 2nd gear will make it harder to get the exit right.
In top gear approaching the end of the front straight, Turns 1-2 is
best taken with a single, late apex. There’s an access road on the left,
and you can use the extra radius it provides before turn-in. You won’t be
able to go to full power past the apex until the car is straight, its that
slick. In most cars its 3rd gear; although the instructors there may
recommend you start with trying it in 2nd, I think the extra torque at the
top of 2nd gear will make it harder to get the exit right. |
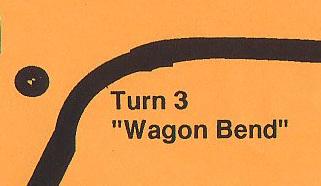 Turn 3 is top of 3rd, or maybe 4th gear. The track-out is the top of a
little rise, so it helps to have the car pointed straight from the apex
out, because you’ll lose grip you had going up the hill to the apex. Run
over the curb at track-out.
Turn 3 is top of 3rd, or maybe 4th gear. The track-out is the top of a
little rise, so it helps to have the car pointed straight from the apex
out, because you’ll lose grip you had going up the hill to the apex. Run
over the curb at track-out. |
 Turn 4 is a kink, closer to Turn 5 than the map shows. It can be taken
flat in most cars. However, it shortens the brake zone for Turn 5, a 2nd
gear corner, so you may want to do some slowing before Turn 4. Also, if
you screw up and go off track past 4, there’s no runoff, just a very solid
hill with a few token tires in front of it. Turn 4 is a kink, closer to Turn 5 than the map shows. It can be taken
flat in most cars. However, it shortens the brake zone for Turn 5, a 2nd
gear corner, so you may want to do some slowing before Turn 4. Also, if
you screw up and go off track past 4, there’s no runoff, just a very solid
hill with a few token tires in front of it. |
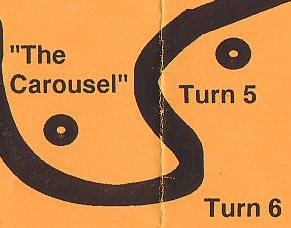 Turn 5 has a concrete patch; keep your right side tires on it. If you
don’t, you’ll give yourself more radius, but the decrease in grip will
make you slower overall. Turn 5 is a throwaway anyway, since Turn 6 is
followed by Turns 7-9, which can be taken flat, so its like a
straightaway.
Turn 5 has a concrete patch; keep your right side tires on it. If you
don’t, you’ll give yourself more radius, but the decrease in grip will
make you slower overall. Turn 5 is a throwaway anyway, since Turn 6 is
followed by Turns 7-9, which can be taken flat, so its like a
straightaway.Turn 6 is a late apex, taken in 2nd or 3rd gear. You need to be patient feeding in the gas, because if you have the line right, its full power all the way to Turn 10. I found that in the Cruiser, with OEM seats and belts, it was hard to shift to 3rd because Turn 7 was pushing my body left, away from the shifter; maybe staying in 3rd thru Turn 6, if its not too low in rpm’s, will make it easier. Those with racing seats and/or belts won’t have to deal with this problem. |
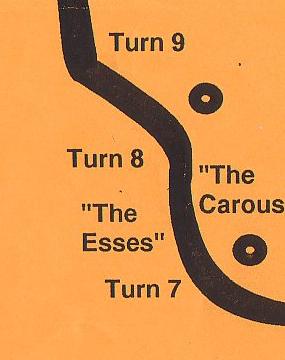 Turns 7-9 can be taken flat in most cars, but not just on any line. Key
is late apexing Turn 8 and not tracking out at all. A late apex in Turn 7
sets you up for this. The track-out of Turn 9 is sort of like that of Turn
3, flat at the top of a rise. So the entry to Turn 9 gives you the extra
grip to point the car in the right direction for a basically straight
track-out.
Turns 7-9 can be taken flat in most cars, but not just on any line. Key
is late apexing Turn 8 and not tracking out at all. A late apex in Turn 7
sets you up for this. The track-out of Turn 9 is sort of like that of Turn
3, flat at the top of a rise. So the entry to Turn 9 gives you the extra
grip to point the car in the right direction for a basically straight
track-out. |
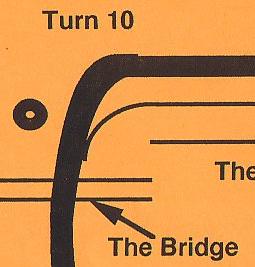 Extra pavement has been added to the outside of the “curb” at the
track-out of Turn 10, making it a very fast corner. However, since most
of you won’t get more than a warm-up lap to look at it, and since it
leads onto a long straight, try it in 3rd the first time, and work up
from there. On the other hand, since its at the end of a long “straight”,
you’ll want to carry as much speed thru it as possible. Just remember,
although you have extra pavement at track-out, you REALLY don’t want to
even just drop a wheel, because the WV clay can grab you and flip you.
The last third of the front straight is downhill, so you may want to save
your last upshift until you pass the crest.
Extra pavement has been added to the outside of the “curb” at the
track-out of Turn 10, making it a very fast corner. However, since most
of you won’t get more than a warm-up lap to look at it, and since it
leads onto a long straight, try it in 3rd the first time, and work up
from there. On the other hand, since its at the end of a long “straight”,
you’ll want to carry as much speed thru it as possible. Just remember,
although you have extra pavement at track-out, you REALLY don’t want to
even just drop a wheel, because the WV clay can grab you and flip you.
The last third of the front straight is downhill, so you may want to save
your last upshift until you pass the crest. |
| Summit Point is very deceptive, with some corners slower than they look (1-2, 6) and others faster than they look (3, 9, 10). Its also very slick, and very unfriendly off-track. In the rain, it’s a nightmare. But with the right combination of patience and bravado, it can be a lot of fun. |
|
Back |